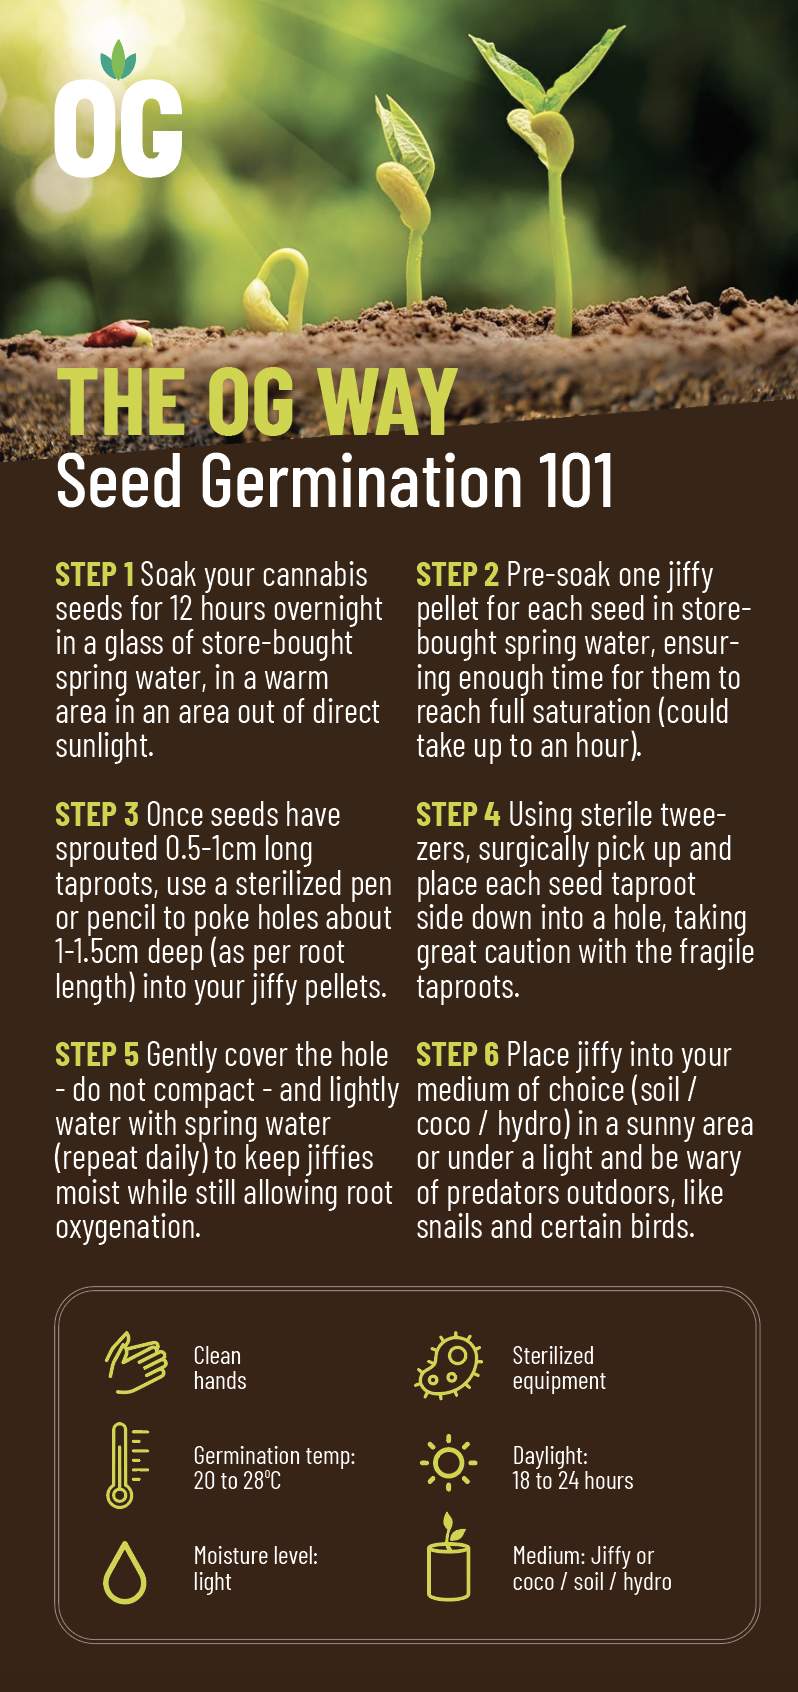
First off, here is a simple infographic depicting Overgrow’s fool proof recommended guidelines for germination success.
Truth be told, there are a few other methods you could use to germinate your cannabis seeds, but we strongly advise all our customers follow “The OG Way” above.
Experienced marijuana growers swear by their method, and you should find the technique that works best for you. In this article, we’ll provide you with all the knowledge you need to find your way. Now, it’s time for a list of the equipment you could possibly need, followed by more in-depth instructions.
Everything You Could Need to Pop Seeds:
- Cannabis seeds (obviously)
- Drinking glass
- Bottled spring water
- Plates
- Spray bottle
- Paper towel
- Tweezers
- Rubbing alcohol
- Pen or pencil
- Jiffy pellets
- Small pots
- Light soil mix
Ideally, you should use rubbing alcohol to sanitize your tweezers. A germination station (heat pad & humidity dome) is ideal for speeding up the process and ensuring success. We won’t list soap – but please always wash your hands well before handling your seeds (or plants).
The following 6 steps include a combination of every possible method you could use to germinate cannabis seeds.
STEP 1: Soak Overnight
Step 1 is very simple but important for success. Before you start, if you’ve bought more than one pack of Overgrow’s world-class seeds, make sure that you keep your packs separate (one strain per glass). We strongly advise using some kind of labelling system (like writing on sticker labels or paper) and also keeping your strains in alphabetical order from left to right, just in case.
All you have to do is get a clean, empty glass – any standard size glass is fine, or you could also use specimen jars – fill it with store-bought spring water (about half to two-thirds full will do, NOT chlorinated tap water!), and then drop your seeds inside to soak for 12 hours overnight (extending this soak risks oxygen deprivation aka drowning). Keep seeds out of direct sunlight and in a warm area indoors, between 20-28°C.
You may notice one or two overeager seeds already pop during the overnight soak, with the radically-named “radicle” or “taproot” (embryonic root) starting to appear.
STEP 2: Paper Towel Method
Some people skip this method and go straight to soil, but it’s up to you if you want to use every available technique. If you’ve grown marijuana from seed before, you’ve undoubtedly heard of the paper towel method.
If you have access to cheaper paper towel (which comes in big commercial rolls in South Africa) then we advise using sheets of that, as it is less porous than your regular store-bought paper towel and there’s less chance of the delicate taproots getting caught and breaking off. If not, don’t stress, the paper towel in your kitchen will work just fine.
Put two sheets of paper towel on a plate and, with washed hands or sterile tweezers, carefully place your seeds at least 2cm apart. Remember to keep track of your strains and use multiple plates if necessary.
Using a clean spray bottle, fill it with good quality bottled water, such as spring water. Lightly spray the bottom sheets of paper towel with water, cover seeds with a second double-sheet layer, and lightly spray again. Take caution not to completely drench / soak the paper towels as you will essentially drown your seeds. A light hand goes a long way here. The sheets will soak up the water and should just feel moist to the touch.
STEP 3: Precision & Patience
Yes, patiently waiting is an active step. It’s at this point that you need to start putting yourself into the mind of a surgeon. Use clean hands, sanitary tools, and be very, very cautious in your approach.
Keep checking twice a day to see if your cannabis seeds have sprouted and to ensure the paper towel sheets don’t dry out. You can often see roots showing through the paper, but be very careful when opening up the sheets to take a peek, as the taproots can easily hook into them and break off – in which case it’s “bye-bye seed”.
Some seeds will be ready pronto, within 12-48 hours, while others may take a few days or even up to a week. Just be patient, keep the faith, and keep lightly spraying the paper towels with water to keep them moist (but not drenched). That being said, while Overgrow provides the absolute best genetics, the sad reality is that some seeds may not germinate. Such is the nature of life itself and there’s no exception for bringing cannabis into this world.
Once the taproots are about 0.5-1cm long, they’re ready to plant.
STEP 4: Plant in Jiffy or Soil
Some growers swear by going from soak to soil or planting straight into soil – either way, the patience & precision of step 3 applies. We recommend planting into jiffy pellets (made from coco coir) first, before planting those into soil, as coco provides the ideal light medium of aeration and moisture that seedlings love.
Simply pre-soak your jiffies in mineral water for about an hour max and they’re good to go. For soil, ideally you want to use a light mix that similarly allows cannabis roots to get the aeration they love. You can buy special seedling mixes or use a good-quality cannabis soil.
Pot sizes are beyond the scope of this article as there are a few variables at play – some swear by up-potting from small to big, while others prefer direct planting into the final home. For the sake of simplicity, let’s say you’re going to start by filling small pots (about 10cm diameter) with soil, leaving at least 1cm empty at the top. Placing a layer of clay pebbles or stones in the base beforehand will prevent soil from draining out.
The two most important considerations at this point are depth and care. Firstly, using a pen or pencil, poke a planting hole in your jiffy/soil about 0.65cm deep (that’s 1/4 inch or just short of 1cm). Next, use a pair of tweezers (sterilized with alcohol) and CAREFULLY pick each seed up, and place it in the hole you’ve just made.
While taproots have an innate ability to find their way down and the first shoot of cotyledon leaves are similarly able to find their way up to the light, it’s best to plant the taproot facing down. The taproot will shoot out of the pointy side of the seed and most OGs agree to plant pointy side (or taproot) facing down.
Gently cover the hole by pinching some coco/soil from beside it (not too much or too compact) and give your pot or jiffy a light watering – remember, the roots need both water and oxygen. Keep in mind that cannabis seedlings don’t need any nutrients for at least the first 14 days – each seed comes equipped everything the baby needs to get started. “Hot” (nutrient-rich) soil and/or too much feeding early on can easily cause nutrient burn.
STEP 5: Place Under Direct Light
Importantly for outdoor growers at this point, depending on your temperatures, you must now decide between putting the newly planted seeds indoors under a light or outside in direct sunlight and the elements. At Overgrow, we advise starting seedlings under a light in a protected indoor environment, and slowly introducing them to the elements – this allow you to get a head start on the season. Remember that cannabis likes a temperature of 20-28°C.
Many indoor & outdoor growers, who start seeds indoors, simply hang a store-bought fluorescent bulb or compact fluorescent light (CFL) about 15-20cm (depending on strength) above the seedlings and await the emergence of the cotyledons (first rounded leaves). Indoor growers also LEDs, which usually start at around 60-90cm above the seedlings, depending on their strength. High-intensity grow lights, like high pressure sodium (HPS) or metal halide (MH) should be kept at a further distance, if they are your only option. The rule of thumb is your finger should not feel hot after 10 seconds.
Seedlings often first emerge with seed shells still attached. Do not give in to your instant urge to interfere (other than spraying with water). Allow a couple of days for the cotyledons to naturally rid themselves of this shell on their own. However, if you notice a seedling that is struggling, put your surgical hat back on, use sanitary tweezers, and very carefully help the little leaves break free.
Once your plants have rooted, they start developing jagged cannabis leaves, they have entered the seedling stage. The light needs to be kept on for at least 18 (up to 24) hours a day right from the outset, so that the marijuana seedlings do not make an instant genetic shift from veg to flowering. Either way, your seedlings need to go under direct light/sunlight, or they will stretch in search of it.
How can you tell if your plants are stretching? Well, you’ll notice them reaching a few centimetres upward, which is observable pretty much overnight. What’s wrong with stretching? Experienced OGs will tell you that the biggest yields are achieved by keeping plants low down early on (and topping / training them), allowing them to spread out sideways and lay a sturdy foundation for big, fat, juicy buds come harvest time.
STEP 6: Know Your Environment
Even the most nature-loving cannabis growers have a certain level of dislike towards pests, fungi and predators, all of which harm you prized plants either through infestation, infection, or simply feasting. All of these are beyond the scope of this article, but one thing is for sure, you’ll want to take preventative action – indoors but especially outdoors.
Some birds have an affinity to devour young seedlings pretty much overnight. Snails are slimy and hungry little suckers to be wary of early on too. Certain moths & butterflies choose to lay their eggs on marijuana plants, which hatch into caterpillars that love to munch on the all-important photosynthesizing leaves. That’s without even mentioning the multitude of molds/fungi, mites, flies, aphids, and other insects that have an affinity for cannabis.
The point is: Do your homework, know your environment, and take preventative measures. Check out our blog for some tips.
Essential Germination Guidelines
When starting cannabis seeds, there are a few important general considerations to be mindful of to avoid making common mistakes. We’ve touched on some of these in the various steps above, but it’s important to emphasize the following factors:
- Temperature: In nature, cannabis seeds germinate in Spring, when temps start to warm up a bit. This doesn’t mean that every seed will sprout on September 1st. Instead, it depends on the unique South African climate in which you live. Make sure that you germinate your marijuana seeds at a temperature between 21-29°C, taking night-time temps into account. They love high humidity too.
- Indoors: In line with the temperature guidelines above, it is advised to pop seeds indoors. This is especially important if you live in a cooler climate, experience cold night-time temps, or sprout seeds early for a head start on outdoor season. In a hygienic indoor environment, your babies are also protected from the elements (wind & rain) as well as pests & predators early on.
- Sunlight: When germinating seeds, you should keep the overnight soaking glass and paper towel plates out of direct sunlight. Once you’ve planted the sprouted seed into a jiffy or directly into soil, however, the opposite rings true – now direct light/sunlight is essential to ensure the cotyledons can, firstly, navigate their way upwards and then not need to stretch in search of light.
- Germination station: In an effort to get the most out of the season, smart outdoor growers often pop seeds early indoors to get a head start, before moving to a permanent home outside. Regardless of where your plants end up, a germination station (heat pad & humidity dome) can help to speed up the process and ensure successful sprouting overall.
- Water quality: Some people might still not realise that tap water is not entirely healthy, as it often contains added chemicals (like chlorine and fluoride) in an effort to sterilize and kill any microbes. Not only are these added chemicals not good for human health, but they’re also not good for plant life and may negatively affect your germination success. We advise using an unadulterated, high-quality, store-bought spring water when sprouting and watering in the early stages of life. Running an airstone in your water tank for at least 24 hours is advised later on.
- Water quantity: Seeds like to be kept moist, but it’s easy to overdo the watering at any stage of the process and essentially drown your beloved assets – e.g., too long overnight soak, oversoaking paper towels, or drowning newly planted seeds. On the other side of the coin, you don’t want to let your medium dry out either. “Light but frequent” is the mantra here.
- Fragile newborns: Get into the mind of a surgeon. Wash your hands and sterilize your equipment. But please, don’t use the perfumed sanitizers going around – rubbing alcohol from a pharmacy will work just fine. Be incredibly careful when performing your operations (picking up and planting), the lives of your newborn babies depend on it.
A quick note on viability: We at Overgrow use specialized refrigeration to keep all our precious seeds viable. You’ll often hear or read that cannabis seeds should be a certain size or look a certain way, but we can testify that they come in all shapes, sizes and colours. All our genetics are sourced from reliable & renowned breeders. They are fully mature, hard and mostly light to dark brown in colour, not soft, brittle, white or light green, which indicates immaturity.
By following these steps and guidelines, you’re giving your precious cannabis seeds their best chance to survive and grow into vigorous, flourishing marijuana plants. From here, you can go your own way. Indoors, outdoors, SCROG, SOG, topping, training, you name it. Overgrow’s blog contains fascinating information on all things seeds and growing.
So, where to from here? Don’t worry, we’ve got you covered.
First off, if you haven’t already, start by buying a pack of seeds – we have hands down the best selection of elite quality international and local genetics in South Africa.
Interested to know all there is to know about weed seeds? Check out our Ultimate Guide. Unsure how to choose between our vast selection of unbeatable strains? Browse through How to Choose the Right Strain.
And please feel free to follow us on social media for giveaways and seed drops (links at top right of this page).
Peace and love,
The OG Team